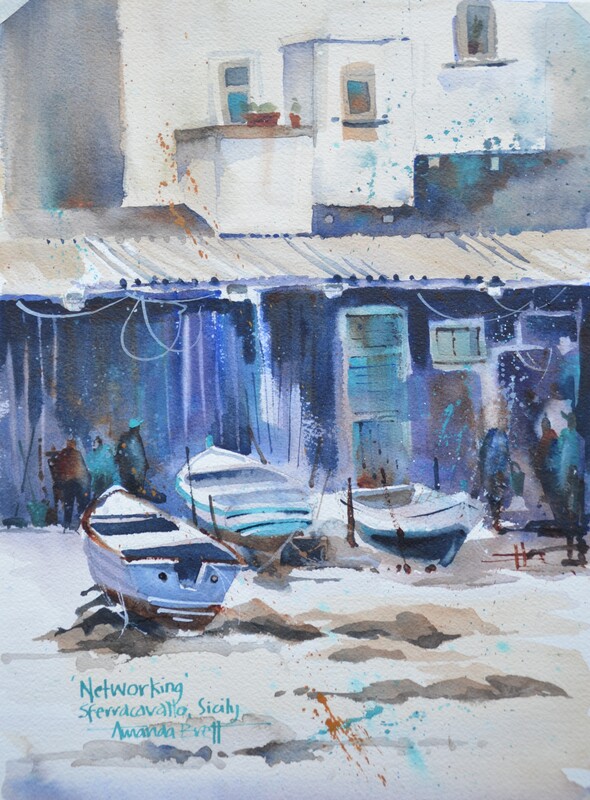
0 Comments
![]() One of the reasons I love watercolour painting is the speed at which I can achieve a painting. If and when I'm clever, I can have a painting today! It took me a long time to get to this point - I've been painting watercolour close to 25 years - it's not an overnight process!! A huge obstacle for watercolour newbies is allowing the watercolour to have it's way. There's a saying "before I paint, I'm in control, once I put that brush down the watercolour takes over". The secret is, until you let go and stop trying to control the uncontrollable, watercolor, as it should be painted, will be difficult for you. Embrace "mistakes" and "accidents", runs and bleeds and allow the painting to speak to you and tell you what it wants. Have another read of my webpage "About Me" and note the last sentence - "I love watching paint dry!" Stop fiddling and controlling and start watching what the paint does, you'll start to notice the really cool effects and passages - watercolours will paint themselves if we let them and they'll certainly do it much better than we can! When we're painting watercolour it's also time to stop and smell the roses! The scary secret is, you might not get the results you wanted or expected and you certainly might not know what to do next - that's the shock of it!! Use your artist's sense of composition, value structure and design to decide next steps - does it need more darks or lights? are the shapes correct? is it balanced and unified, etc etc. Make a cuppa and watch the paint dry!! ciao i miei belli amici!! Amanda Come paint with me in Italy Watercolour for Beginners - Auckland New Zealand Weekly Classes - Auckland New Zealand En Plein Air - One Day Workshops ![]() I've been listening to lots of podcasts from artists who love painting en plein air like I do - the interesting thing is, I come from the school of painting what should be there but most of the artists I've been listening to seem very focussed on determining the exact shade of colour (temp and hue) and the exact value of each shape and finding the right scene/subject. When I discover a scene/subject to paint, I can guarantee you I will feel the need, rightly or wrongly, to shift some things around (lamp posts are never in the right place), and change colours and values to suit my idea. I have 2 thoughts about this, firstly, I am NEVER going to find the perfect scene so I might as well get down and dirty right now. Secondly, I am an artist, it's my job to make whatever it is beautiful and meaningful and tell my story through paint. Imagine how many hours I would lose just by simply wandering around looking for the right scene/subject? Most often I have 2-3 hours to paint on location, I better make it snappy. Don't get me wrong I deliberately go to places that I know will please me (crusty, rusty and horrible are the key words here) and I do like it when someone chooses for me and gives me a challenge - its all too easy to fall into the trap of painting the same things over and over. Back to WHAT SHOULD BE THERE. So what should be there? well that's up to you to develop your skills of observation and your sense of good taste and design. While in Raglan NZ recently, I went to paint the orange dinghy - how disappointing ... i could barely tell it was orange ... back in the day it positively glowed and reflected into the bay, not only that, the fab building behind it doesn't exist!! My biggest problem is I believe my own press ... I really remember the house being an architectural wonder but I think i painted it that way many years ago and the painting is stuck in my memory!! So I decided to paint the old Dairy Factory behind the nasty building, it's obscured from every vantage point so I'm going to have to make it up, there will be ladders and brooms and mops and buckets, maybe a bloke walking by with a fishing rod. What i really need to consider is how important is the Dairy Factory and if i decide it's very important then i will have to decide what elements I will need to help me communicate "Dairy Factory" without getting naff or kitsch!! The secret message today is, use the scene/subject/photo as your inspiration, not something to be copied faithfully, just because it's there doesn't make it right for a work of art, if they brought back bell bottoms would you wear them? Give your artistic license a whirl!! ciao i miei belli amici!! Amanda Come paint with me in Italy Watercolour for Beginners - Auckland New Zealand Weekly Classes - Auckland New Zealand En Plein Air - One Day Workshops it saddens me that so many people are so creatively blocked.
this is really a telling-off post, so if you are a bit delicate better go and read something else. Many people come to my workshops and classes and are totally soul destroyed that their painting hasn't worked out. How do you think i feel when i paint a clunker and have nothing to sell?? how do I put food on the table then McDuff? mamma mia!! What happens when I paint something really fab and it still doesn't sell?? mamma-flipping mia!! Students invest heavily in a one day workshop and expect to come out with a masterpiece, or they say "I'll see how the day goes and if I paint something really good then I will come to your classes". Erk - hello? They make up all these weird rules, goals and stories that are really just blocking their creativity and maybe even their lives. Come on people, time to straighten up - life's not meant to be easy, I'll bet you don't expect to play chopin if you haven't played the piano before. So why is this any different? I discovered why this morning, and that's why I am sad. I am sad because then you don't have to put any effort in and if you don't put effort in you don't have to face the reality that maybe you are not as creative as you thought you wanted to be. The truth is, creativity takes effort and hard work - paintings, sculptures, poems don't just miracle themselves. A true artist works at their skill, develops their ideas, studies and thinks, reworks when things go pear-shaped: creativity takes intellect, creativity takes guts. The not-so secret is creatives are disciplined and have thick skin and are regular failures. I'm sad you are too scared to have a go. I'm sad you are too scared to work at it in case you fail. I challenge you to be kind to yourself and have a go and fail and pick yourself and have another go!! :( Amanda Come paint with me in Italy Watercolour for Beginners - Auckland New Zealand Weekly Classes - Auckland New Zealand En Plein Air - One Day Workshops ![]() Do I have to finish my painting on site for it to be classed as en plein air? When is a plein air piece 'en plein air' and when does it become a studio piece? I reckon if a work is substantially created on location, let's say 95%, then it is an en plein air painting. To add a couple of additional marks when you return to your studio does not make your painting/sketch a studio piece, it just means you know how to finish a painting or you had to pack up quick to get away from the approaching storm. At the end of the day it really only matters if you are entering en plein air competitions and then you'll be on site in the thick of it. It seems there are too many rules and regulations about art and creating, it seems to me that most of these 'rules' are handed to us from either 150 years ago or by some 'expert' who is not a painter! To be a creative is to not be bound by other people's 'rules'. For example, for me, it does not make sense to go back to the same place for several days running to complete a painting - I certainly would not be able to do that in NZ (4 seasons in one day - and fairly unpredictable unless mid-winter and then you know it's going to be rainy or stormy!). Further, I want to push my skill as a watercolour painter and develop my creativity and thinking, watercolour is fast and immediate, i want to take advantage of that while I can. For me, en plein air is all about getting to know a scene/subject, understanding it's essence and getting a sketch down and dirty as quick as possible. I give myself 1.5 hours - after this time, light and atmospheric conditions have changed substantially and only provide a new set of facts that are likely irrelevant to my current work. My plein air sketches provide me with detailed notes so I can create a finessed studio painting, sometimes my plein air works are good enough to sell, sometimes not - so be it - do it again! My methodology is to scope out the scene, sit and observe the light and shapes from my selected spot, create/design a couple of thumbnail value sketches, take a mental snapshot and get stuck in. A painting buddy pointed out to me recently that I don't refer to the actual scene very much after that except for a few detail reminders. For me it's all about the essence of the scene, and certainly, sometimes I wonder who made me paint in that particular locale - it's all their fault!! :) Please remember these are 'rules' i have set for my myself and you don't have to follow them blindly - they might not work for you/your current style/medium/whatever. I think this is where students get caught up, rule #10181614172930 works for X and X swears by this rule and may insist their students follow it too (when a tutor start telling their students there is only one way and it's their way or the highway, choose the highway!) Remember, there are no magic bullets - you might have to forge on and create your own methodologies - experiment and have fun!! ciao bei pittori xx Amanda Come paint with me in Italy Watercolour for Beginners - Auckland New Zealand Weekly Classes - Auckland New Zealand En Plein Air - One Day Workshops ![]() You probably know this - colour mixing in watercolour is vastly different from other mediums. There are several reasons for this, including the fluidity of the medium - water; the watercolour paper; sizing; the pigments; and, the white of the paper. To explore colour mixing with water further, water is used to lighten and deepen values and saturates. The more used, the lighter the value; The opposite is also true, the less water used, the stronger the colour, saturation and value. Although there are many ways to paint a watercolour, a process for the beginner watercolour painter to live by is to start your paintings with more water and less pigment, subsequent washes should have less water and more pigment until your final marks are virtually paint straight from the tube! In addition to using water, the colour we have that's not a colour is the white of the paper. In transparent washes, light travels through the paint to the paper and bounces back and helps to optically lighten values, this is also the reason we use a white palette and not a coloured palette. Professional grade watercolour paper is not actually paper at all; Exhibition quality 'paper' is made from cotton rag, versus student papers which are made from wood pulp. Exhibition papers are archival meaning they are acid free and, providing they are kept thoughtfully (not under the bed), in a dry, cool environment, away from direct sunlight they will be perfect for a LONG time!! Framed paintings should be hung away from direct sunlight just like any other artwork in any other medium. I have to admit I am not an expert on watercolour paper sizing (i'm not much into the science - I just want to paint, so I'm not going to pretend), what I do know is that the sizing helps to keep the paint on the surface of the paper thereby helping to retain your painting's brilliance, lustre and transparency. A good quality paper will be sized to it's core not just on the surface. This means that, from a colour mixing perspective, different papers work differently and will allow the pigment and water to work differently. Although black and white pigments are manufactured, typically, we do not use a black for dark value washes, nor a white to lighten. My reasons for not using black as a wash is because I find it exceedingly boring. For me watercolour is about poetry, there is no poetry in black!! Watercolour painting is about creating beauty and light and life, as Delacroix said 'Colour is the fruit of life'. I encourage you to step outside and find a dark area and observe the light bouncing around and colours reflecting, treat watercolor as an adventure. I prefer to make my own darks, creating areas of light and dark, warm and cool, opaque and transparent - so much more interesting!! If you are desperate, paint a black painting and get it out of your system! Apart from that, most blacks are created using a kiln firing process and seem to be very sooty, my eyeliner is the only black near me!! I have to admit I LOVE white gouache, I slap it in to darks (with restraint, sometimes not!) just for the fun of it. I also love white marks in a watercolor painting, however, white watercolour and gouache is not so pretty when used as a wash (and unnecessary!) proceed with caution. There is vast range of watercolour pigments available falling into 4 main categories: transparent, opaque, earth and staining. Many of the pigments are made from natural minerals and due to these natural qualities, react and bounce off each other, quite fun to watch and experiment with. To give yourself the best shot at painting watercolour, be kind to yourself and buy a set of transparent primaries in a professional grade of paints, however I recommend you seek advice from a specialist watercolour artist before purchasing. For a beginner watercolour painter, I recommend just four pigments - get used to them and understand how they work together - do resist the urge to splurge - you will have more fun with a limited palette!! The pigments I suggest are artist quality tube paints, Permanent Alizarin crimson, phthalo blue (or french ultramarine), Indian yellow (or new gamboge) and burnt sienna. The most useful tool you can make for yourself is a colour wheel made from your own pigments. Just choose any yellow, blue and red then mix a purple, orange and green - complimentaries - yellow is opposite purple, green is opposite red and orange is opposite blue. This is important because the colour wheel, for example, will show you the complementary colour to neutralise a bright/saturate pigment eg neutralise or dull a yellow by adding a touch of purple or it will help you decide which colours to charge into a luscious apple's shadow and which colour to choose to make one colour stand out from another. From these pigments you make a gorgeous silvery (or warm) greys, a luscious rich lively black and a myriad of other colours just with 4 pigments!! You can progress this by mixing a light value colour wheel and then a dark value wheel just by altering the amount of water on your brush. Colour charging is exciting and frightening all at the same time - while the paper is damp, and without washing your brush, load up another colour and simply 'charge', ( ie slop, slap or drop) this new colour into or next to, the original colour. With watercolour, fewer brush strokes are definitely more, this also works for colour mixing on your paper. When charging in colour use ONE brush stroke - every additional brush stroke is another step toward opaque, 'dead' colour and lost luminosity. Due to its transparency (even opaque pigments are quite transparent) glazing can be used to modify a value or temperature or simply mix colours. Glazing is washing over a previously painted area, use a soft bristled brush to ensure previous layers are not disturbed. For example, if there was an orange car in the distance but it's too bright and taking over, you could knock it back to the distance by glazing a wash of a blue (or purply-blue) over the orange, its not necessary to be neat just wash over everything that's intended to be in the distance, soften off an edge here or there and you're done! Colours can also be mixed onto dry paper with wet brush/paint (aka wet into dry). Place colours beside each other and catch the bead from the previous mark, the secret is not to touch the same mark again, just keep catching the bead of the previous mark until you get where you're going. One of the main advantages of watercolour is wet-into-wet painting. For amazing blends of colour, soak a piece of watercolour paper in a 'bath' for no more than 5 minutes, let the drips run off and place the wet paper onto marine ply or gatorboard. The paper will stay wet for sometime and you will be able to paint until it is dry. Watercolour is the oldest known painting medium - the sistine chapel fresco is a type of watercolour! Think of painting watercolour with a feather - that's all it needs - a gentle touch!! happy painting miei cari amici xx Amanda Come paint with me in Italy Watercolour for Beginners - Auckland New Zealand Weekly Classes - Auckland New Zealand En Plein Air - One Day Workshops © 2020 copyright Amanda Brett, all rights reserved ![]() Thrilled to say Auckland Viaduct studio greys has been awarded 1st prize by Watercolour New Zealand and Gordon Harris Art Supplies. I had painted the same subject en plein air the previous day and was dissatisfied with the result, I was, however, inspired to create the scene with a new composition and a different mix of greys. As I am a heavy handed painter and struggle with light values and greys, more practice required!! I started with a loose thumbnail value sketch, then applied a loose simplified sketch to my watercolour paper. Painting in an en plein air style ie, top down, I started with varying mixes of greys (phthalocyanine blue, alizarin crimson and burnt sienna); warmer hues gradating into cooler and sometimes painting with clean water, all this around planned whites. Once the shine had left the paper I splashed in some some light value spatter and continued to paint stronger washes of colour - that is, less water more paint with each successive shape created. Parts of the “office” and fishing boat were painted with colour straight from the tube. I painted in some dark people and also scrubbed out some lighter value shapes. The paper was still quite damp which allowed me the freedom of soft edges and more spatter. I also started to add accents of raw sienna, cerulean blue and splashes of white gouache. I get totally absorbed in negative painting - the worse you do it the better, some soft edges, plus some bleeding - squirting water and when close to dry, some final hard edges. I added some calligraphy marks to seal the deal. For international and local workshops and classes www.amandabrett.net ciao cari amici xx Amanda
If you want a little heads up before you head to a new art class or maybe a little refresher if you've had a break from painting and drawing, have a look at my short video, Paintbox Tip #3 simple silhouette sketching! grab a plain white cup and saucer and have a go at drawing the cup to start with, don't worry if you think it's not right, do it again and again!! most artists draw/paint same subject over and over and over!! We should too!! draw cup and saucer from different angles and different heights but keep everything quite small - on your paper, cup should be no more than half the size of the actual!! the really cool thing about pencil sketching for watercolour painters is the similarity of process - painting/sketching from light to dark and building up layers of value to describe form and light!! ciao ciao cari amici! x
It seems to me that students struggle with loading their brushes with enough colour and water. Their watercolour paintings look dry and overworked and seem to have a "scrubby" look. See my Paintbox Tip #1 to see how to load your natural bristle brushes with good juicy, rich paint! Copyright 2009-2018 All images and text on Amanda's blog and website are the legal property of Amanda Brett and may not be reproduced without express permission, thanks for respecting my art and creativity.
Paintbox Tip #2 - Palette Selection - How to choose interesting colours for your next magnum opus!!8/1/2018 ![]() A lot of my students ask me how to choose a palette. Specifically "How do you pick interesting colours for a painting?" There is much science and theory on choosing a palette, for example a primary palette, tertiary triad, split complementary or harmonious triad - the list goes on! Proprietary Colour Wheels are great BUT they're not based on watercolour pigments/colours we can buy, they're printed using four (or 6) colour process based on commercial primary printing colours cyan, magenta, yellow and black. In addition, a true colour wheel is made up of primary colours that are neither warm nor cool but neutral. I have to admit I don't have a secret palette selecting trick, my palette is based on the pigments rather than "colours". Hence, I'm more interested in what my pigments will do together, how they mix together (can i make a great, interesting dark), how they react to water, paper and each other. See my youtube video below. For example I could go and buy lemon yellow and Paynes grey. Unfortunately for lemon yellow and Paynes grey, they are 2 pigments I like least, lemon yellow is too cold and too opaque, not a good mixer, and Paynes grey dries about 50% lighter than one expects - too unpredictable for me! My faves for a long time have been transparent watercolour pigments and then I throw in some goodies at the end. So when you ask me "what colours?", my first answer will be "what have you got and what can you do with them?" I often select 3 primaries, or a version of 3 primaries and make a colour wheel, it doesn't matter which 3 colours/pigments, all one needs is a version of a red, blue and yellow. It could be burnt sienna for the yellow, prussian blue and quinacridone magenta, the point is what new colour combinations will you be able to create? Another question for the painter to pose is what kind of mood or story do you want to tell? For example, a dark winter's day or a happy summer day? For the non-realist painter "What colour do i feel like painting today? do i want a pink painting or a blue painting?" the answers spin off from there, if a pink painting one could either choose a complementary green or harmonious colours red orange yellow and then an accent of purple or green. What colours do you like? Head down to your local art gallery and spend a few minutes actively searching for colour combinations, whether you like the painting or not, is a good exercise in palette selection and most importantly, discovering your own likes and dislikes. let me know how you get on - leave a comment!! :) ciao ciao Amanda x ![]() The cool thing about Watercolour is that it is mostly not too difficult to fix. I know, I know, everyone says how it is the most difficult medium but truthfully, everything new is difficult and the myth sayers I've met are the ones who can't paint (watercolour) and have given up. The main issue most beginners in watercolour painting have is determining what the problem actually is!! Sometimes there actually isn't a problem but we've got to that dreadful middle stage and don't know what to do next. If you definitely have an issue to solve, read on McDuff!! If you decide the composition or design is a problem, redraw a value study of the corrected composition on spare paper and re-work the improved version into the painting. Yes - that's right paint over it, you might need more paint! Could you draw/paint it better? Practice drawing the shape you require on spare paper, then practice painting the shape/colours etc on some spare watercolour paper. Wet the offending area, sponge out problem shape/area carefully and re-draw and paint. A shape is not quite right - I've solved this problem in my paintings in 6 or 7 different ways. Here's a couple you can try (1) wedge a dark tone next to the problem area correcting the shape, (2) stencil lift to correct the shape or (3) soften an offending edge with a damp sponge. What watercolour problems cannot be fixed? The most difficult actual watercolour problem I have found is too much opaque pigment mixed too much on the palette and then stirred up too much on the paper - too dead! Sometimes a stencil-lifted highlight will work or you could try adding more detail to another part of the painting to draw attention away from the offending area or carefully glaze a transparent complementary colour over the problem area to knock it back. Always try to push yourself to finish every painting whether you've decided it will be a 'good' painting or not. The truth is, you might not be able to fix a work you've deemed irretrievable but the effort of trying will teach you more about watercolour/painting/process than starting yet another painting that you'll struggle to complete. Further, if you've already deemed the painting a failure, you really can't make it any worse - keep at it!! check out my Paintbox Tips for more watercolour help!! happy painting!! Amanda Workshops in Italy Classes starting Feb 11 2020, Auckland New Zealand Student Feedback Gallery Copyright 2020 All images and text on Amanda's blog and website are the legal property of Amanda Brett and may not be reproduced without express permission, thanks for respecting my art and creativity. ![]() There’s nothing easy about painting watercolour en plein air but, for me, it is an exhilarating and fun experience. My early attempts, however, were difficult and my paintings absolutely atrocious! It seemed to take me forever to get to grips with this new style of painting in the great outdoors. Without realising, I was faithfully following the 80/20 rule, 80% observation 20% drawing /painting. Later it dawned on me this rule does not apply to painting watercolour en plein air - I was trying to follow a guideline for the constant situation of studio/observational drawing from life. When painting in the field, from the time you select your subject to your end-game, the painter has about 1-1.5 hours, 2 hours at most, to capture the subject before light and atmospheric conditions change too much. No mean feat but, if you practice, you will improve every time. Another element to consider is the subject. My first attempts at painting en plein air were with groups of artists who love painting landscapes. For me, it was a big problem. Although I love good quality landscape paintings, I’m not interested in painting them myself. I’m a city girl afterall, I’m attuned to light and shadows bouncing around architecture and the people who inhabit amazing spaces. Just think of Lisa Douglas (Eva Gabor) and you'll have hit your nail on the head! I often tell my students to slow their painting process down but in the case of painting watercolour en plein air, I’m going to contradict myself and tell you to speed up! Speed up so you catch the light and changing conditions. Give yourself 5 minutes, and only 5 minutes, to take photos and sketch 1 or 2 value thumbnails and most importantly, take a mental snapshot. Make your memory work for you and, even if you think your result is "wrong", your work will be formed of the essence of your subject. Perfetto!! What a great excuse to go out and paint it again!! Your next work at the same scene will include different features and details and the next different again. My personal strategy is to map the subject onto my watercolour paper with a 5 minute sketch and then not refer to the actual scene again. I am painting my interpretation of the scene not a photograph. Changing light and shadows become mighty confusing and create confusing paintings. Learn the tools you need to assist you:
x Amanda |
Amanda Brett Watercolour ArtistPaintbox Tips, secrets, thoughts, scribblings and doodles on art, my life as an artist, travels and musings!! www.amandabrett.net Archives
June 2019
Categories
All
Archives
June 2019
|